This is by far my most watched YouTube tutorial. Right now it has over 900,000 views. What the WHAT?! That’s crazy cool. I had no idea that it’d be such a hit. I had made many ear warmers, but they all had the same irritating issue. The knot in the center that creates the “bow” look was chunky and uncomfortable on my forehead. I’ve remedied that issue. Video and pattern are below. If you have any questions, the video will explain everything! Have fun!
For this pattern, I chained 19. If you want it to be thinner, chain less than 19, or chain more for a wider ear warmer, but make sure you chain a multiple of 2 plus 1 turning chain!
What you’ll need:
- Worsted weight yarn (size 4)
- A size H crochet hook (5 mm)
- Scissors
- Yarn needle
Stitches used:
- Chain (ch)
- Single Crochet (sc)
- Slip Stitch (sl st)
- Half-double crochet (hdc)
Chain 19
Row 1: Sl st into the 2nd chain from the hook, hdc into the next st, continue alternating sl st, hdc until the end of the row. Your row should end in a hdc stitch. Chain 1, turn.
Row 2 and beyond: Repeat row 1.
REMEMBER! You will always start your row with a slip stitch, you will always end your row with a half double crochet stitch.
Continue your moss stitch rows until the ear warmer is at the length you desire. You want it to fit around your head (or the head of who you’re making it for) with 1/4 -1/2 inch gap between where the 2 sides meet. Do NOT tie off.
Make sure to slightly stretch the ear warmer when pulling it around your head so it fits right. Too tight will be uncomfortable, too loose will not stay put. Leave 1/4 – 1/2 inch space.
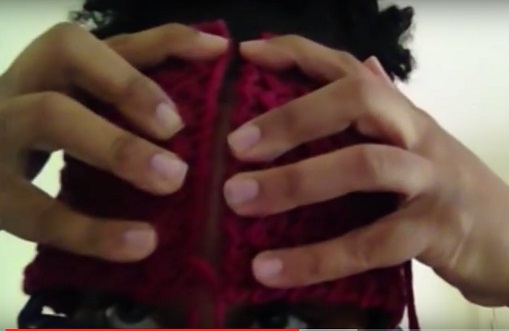
Now that your ear warmer is at the length that you desire, lay it flat and bring the sides up to the top center this:

Here is where you create your zigzag connect of the 2 front sides.
Make Your Connect: Continuing from your last slip stitch, ch 4. Sl st the chain to the top end of the other side of the wear warmer. Ch 4. Sl st to the opposite side about 3/4 inch down. Ch 4. Continue zig zag connecting all the way to the bottom until you have this:
Tie off your yarn. Bunch up your ear warmer so it gathers in the center and tie your ends around it to secure it.

Sew in your ends and cut them off. The last thing you need to do is make the band to wrap around the center. Since you chained 4 for the zigzags, we will have a band of 4 stitches across to cover it.
Make Your Band:
Ch 5
Row 1: Sc in the 2nd ch from the hook. sc in the next 3 ch, ch 1, turn
Row 2-5: Repeat row 1 checking to make sure your band is long enough. If you need it to be longer to fit around your bunched zigzag connect, make it longer. Make sure it isn’t too loose fitting. Tie off.
Wrap the band around the center zigzag connect and sew the 2 sides together. Sew in all yarn ends and YOU’RE DONE!
I hope you enjoy your new ear warmer. I also apologize that it took me so long to get this video up on the blog. I’ll be posting again soon!
-Lee

I will certainly have to try out this one! Thank you for sharing!
No problem! I’ve made a bunch this fall already. I’ll be making more through winter too. They become so effortless and quick when you get use to them.
Do you go through both stitches on the top or just one? It looks like both. Just making sure! Can’t wait to try!
Do you mean loops? You want to go through both loops of each stitch! Go on and give it a try!
Yeah I think I meant loops. Basically each stitch has two yarns I can put my hook through. I have only ever gone through one but it looks like here you go through both! Thanks! So excited!
Thank you so much can’t wait to star mine
Thanks for the pattern! It’s great! I made one for my SIL and she loved it. It was easy to crochet and the stitch is very pretty.
Desde Costa Rica te saludamos. Bendiciones por tu creatividad. Felicidades aprendí mucho con el tutorial de la vincha es hermosa. Esperó poder seguir tus proyectos.😊
Gracias
This is a pattern I like and will make it. I was wondering if for the wrap, you could use an I-cord. I think I will try it. Thanks for the pattern and I think you are a very good ( I say teacher).
Did you try that? I bet it’d work great!
Love your video for the crochet head warmer, my daughter is a teacher so she can wear it outside when on bus duty this cold winter! Thanks so much for the very informative instructions, your voice is perfect for you -tube instructions! Thanks
Oh my gosh, you’re so sweet. Thank you so much. Also, if you sew at all, remember you can line them with fleece for extra ear warmth!
Hello. I’d like to make this for a 1yr old. How many chains would you recommend I begin with? I’m not understanding the “multiples of 2 plus 1 chain stitch” you mentioned. Can you explain? Thank you kindly. 🙂
Chaining a multiple of 2 is just as it sounds. So any even number will work. Chain the length you need in multiples of 2, make sure you count. Then add 1 more for your turning chain.
I don’t know the size of the child’s head so you’ll need to figure that out. Remember, you’re chaining for the width of the ear warmer. I hope this helps.
It does help. I wanted to be sure it was as simple as it sounded and I guess it is. Haha. Thank you for responding so quickly. 🙂
I’ve made this ear warmer a couple of times for my big girls and they love them. It’s so plush and beautiful. Thank you for sharing this pattern!
Thank you for taking the time to post this. I am using this for tedxture for some kitten ear headbands. Let’s see how they turn out!
Can you use a bulky yarn for this pattern?
You sure can! You just need to follow the directions for the width. Any even number of stitches +1 turning chain.
This sounds like something I can make even though I am basically a beginner. Thank You for sharing this pattern and for the video. You have such a soothing voice on the video.
Thank you! It should be doable for a beginner. Just follow the video. I walk you through!
LOVE your videos!! they are easy to follow and you present them very well !! Some video tutorials I just can NOT stand to listen to the presenter!! I just have to turn off the volume or find another one if possible but you are very easy to follow and listen to.